Aug 28, 2011

Dresser + Table top = Kitchen island

Ta-dah!


I was extremely bored, so in a whim I made this kitchen island out of an old dresser.  Ha!  Just kidding.  This project took me a couple of months from idea inception to actual start of work (the work itself is only a couple of weekends, and that's only because of the paint-drying time).

We needed additional counter space and a place to eat in the kitchen, and I thought a kitchen island would be nice.  When we remodel the kitchen (eventually, maybe in 5-10 years time), an island is a must.  In the meantime, I didn't want to spend a lot of money for the current project.  So, I used one of my MIL's dressers that she allowed me to keep/sell/makeover.  This dresser I actually used for clothes before we moved to the new house, but since I no longer needed it and it's a 35" tall (just about counter height), it got sacrificed (though not in vain!).

Here is it before:
I had already started applying the paint stripper on the top of the dresser, before I realized that I didn't have any "before" picture.  Oops!

After priming:

Because the dresser was stripped down to the raw wood, I used tinted Zinsser High Hide Cover Stain oil-based primer, which was leftover from the front-door painting project.

After painting:
The paint is Benjamin Moore Metal/Wood Lacquer in Brilliant Red, also leftover from the front-door painting project. The dresser top I left unpainted, because the counter top was going to cover it anyway. 


Now, for installing the counter top, I marked and drilled a few (10) pilot holes on the dresser top for screwing the top:
You might make out the barely visible X pencil marks, which indicate the pilot hole locations.
The counter top is Ikea Vika Byske, which was the perfect size for the dresser with some 10" extension on three sides for bar stools (the dresser is 40"W x 20"D x 35"H).  At 1", it's not as thick as normal counter top, but it's made of solid wood and relatively cheap for $80 (solid wood counter tops of this size can run about $300-$400!)
I wasn't sure if the the bottom of the wood needed to be sealed, since it's not being exposed to anything other than fellow wood, but I sealed it anyway with Feed-N-Wax.

Then, T and I put the dresser up-side down on the bottom of the top (in this case, picture is definitely better than words), like so:
Because drilling downward is much easier than upward.  I gave T 100% credit for this idea.

For attaching, I used screws with washers:
The washers because moving the unit means grabbing it by the wood top, so I thought they would prevent the screw heads from being accidentally broken off from too much pressure.

Underside picture after attaching:
Oh, I didn't use glue at all, in case we need to detach the top for whatever reason.

And here's the finished product, gloriously sitting in the middle of the kitchen like it owns it:
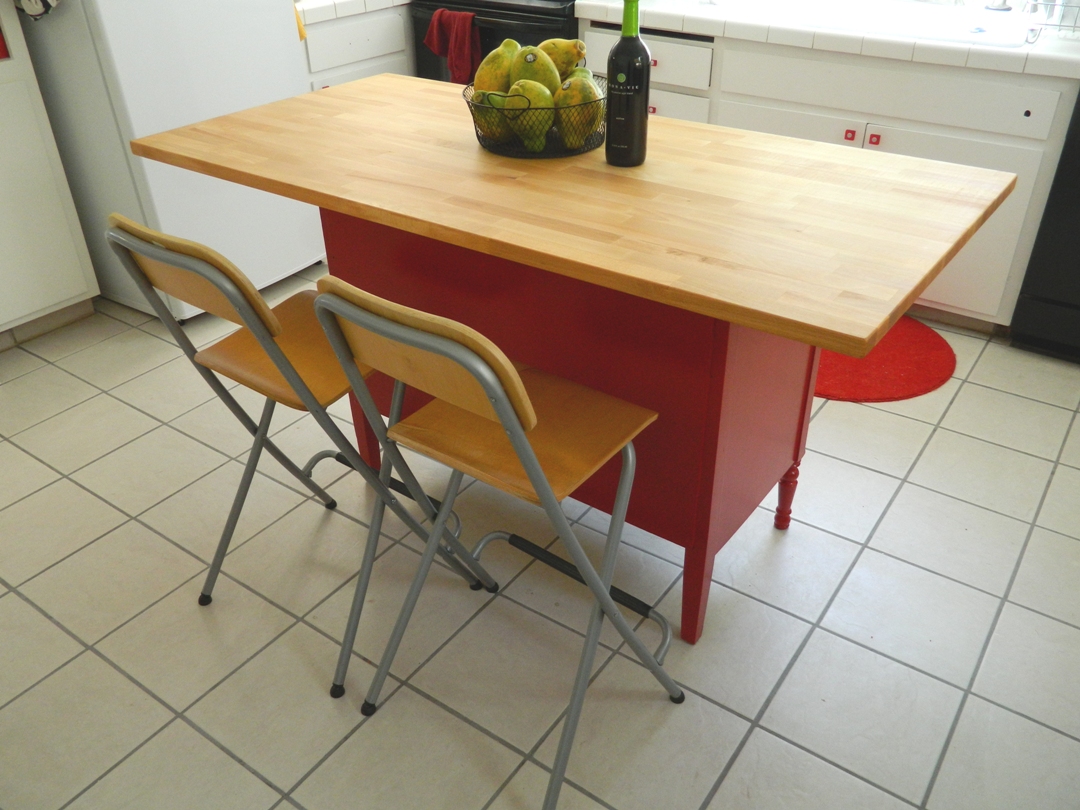
And the front:

Bar stools are Ikea Franklin, purchased from craigslist for $10 (not each; for both!).  One of them has some water stain, but I'm planning to either stain or paint them later.  Those are Hawaiian papayas, my favorite fruit for the moment (I buy 8 at a time for the whole week), and the wine-bottle-lookalike is some acai berry juice that was given to me (I use it exactly as pictured: for decoration).

Cost breakdown:
- Dresser: $0
- Table top: $88 with tax + about $20 cargo van rental
- Bar stools: $10
- Primer & paint: $0
- Knobs: $18 with tax (had to buy 4 new ones because of some accident in which the paint stripper is at fault)
TOTAL: $136


Not too shabby.  Now T and I have a place to sit and watch the sink!

Linking to:
The DIY Show Off


Thirty Hand Made Days


Jul 19, 2011

Kitchen makeover, part 3: After!

Finally, after almost a year of on-and-off effort on fixing up, the kitchen is done*!

*excludes floor, countertop, backsplash, lighting, appliance replacement, dining setup, island, and everything else that basically makes up a good kitchen.  God, I'm so tired.

There are separate posts for when we started scraping everything and the hardware dilemma.  As a summary and for ease of viewing, here are the before pictures:


And the after!


Um...

Wow.  What an underwhelming reveal.  Although it does look different and considerably lighter.  It still has a long way to go, but I'm liking this kitchen a lot more. Especially knowing how much of our own sweat, tears, and blood we've put into this project. Okay, fine, I'm being overly dramatic here, but it was a lot of work and it was our first major project, so I'm very happy that it's done and with the result too!

A few notes regarding this makeover...
  • I can't stop staring at the fridge.  It is so big.  And white.  And protruding.   Kind of like my stomach nowadays, hehehe...
  • The bright light on the ceiling is unfortunately not a heavenly light shining down upon us, it's just a skylight.  
  • The little black strip above the drawers to the right of the stove is a slot for the cutting board (I'm not sure where it is), that we will probably cover up and paint.  
  • The hole next to the dishwasher will be plugged. 
  • A little GI Joe action figure at the window guards the kitchen from the kids next door.
  • The microwave is a little too big so the sliding doors cannot be used.  I use this little thrifted artwork (from Goodwill, $5!) as a semi-door to hide the toaster behind it:

Still to do for the kitchen:
  • Install lighting.
  • Add plants.
  • Organize the telephone area.
  • Makeover the dining table and chairs.
  • DIY a kitchen island.
  • Replace the stove to a white one.
  • Somehow remove or hide the black dishwasher, since we don't use it.
  • Ideally, update the countertop and backsplash.  At least regrout the tiles.
Ultimately, I'd like have hardwood floors in the kitchen, although at that point I'd probably want to demo everything and remodel with a different layout and install a french door leading to the backyard.  Maybe, in five or ten years.  For now, I rest.

Linking up to:

Jul 18, 2011

Kitchen makeover, part 2: Progress

After we cleaned up the kitchen as much as humanly possible without completely gutting it, we started painting.

The kitchen is south-west facing, but for some reason it's kind of dark most of the time.  So I chose a white paint (BM Simply White) to lighten up the whole kitchen and to visually purify it of all yuckiness that it previously had.  The walls, ceiling, trims, cabinets, were all painted the same color white.  If I could paint the tiles white, I would.

We finished painting before we moved in November, and until just this weekend, we lived with this "open-shelving" style that is definitely NOT for us (visual clutter leads to literal clutter, and let's be frank that we're not the neatest couple in the world), while T took his time finishing painting the cabinet doors:
Yikes.  I can't believe I'm putting this on the internet.
In the next four months, in between my nagging and complaining about the exposed mess, I shopped around for knobs & pulls and fell in love with this:
Siro Decco knob!

And matching pull handle!
Thankfully the cabinet doors are just plain boards, so they could take any style of knobs and pulls.

And this hinge's clean look goes well with the knobs and pulls, even though the finish isn't quite matching, but it's pretty close:
Discreet enough.
Of course, life would be so uninteresting if it all worked out just so.  After installing the first set of doors, we found out that the hinges prevented the doors from closing completely because of the added width.
Curse you!
So I very reluctantly returned those hinges and bought the generic inset hinges in white, hoping that they would blend in with the paint and not clash with the cute knobs:
Bleh.
Well, at least the doors will close.
 I wasn't too enthusiastic about finishing up the cabinets now, until I found Rockler's salice hinge specifically designed for 3/8" lipped doors!
Hallelujah!
Problem solved!  Invisible hinges, no need to worry about matching the knobs!  Except, they are $25.99 per pair, about 10 times as much as the generic hinges.  I cried a little and cursed a lot.  After about a month of contemplating (how important is it?) and justifying (we saved quite a bit by fixing up the kitchen ourselves), I finally bit the bullet and splurged on the hinges. 

Another couple of months passed.... and without much planning and thinking, I started working on installing the doors.  I marked the hinge locations on the doors and frames:
x marks the spot
 Routed the circles on to the back of the door:
I like this part, makes me feel like a true DIY-er
 Screw the hinges onto the door:
And I like this part too, 'coz it's so easy.
Blindly screw the mounting unit to the frame, using a heavy-ass right-angle drill:
The screws go in toward you, so a right-angle drill is a must.  Eyes optional.
 Then attaching the connector between the mounting and the hinge:
Hand screwdriver is best; I inadvertently snapped off a screw using the power drill.
I did all of that, and I crumbled at the last step, which was clipping the hinge onto the connector.  I mean, seriously.  Just clipping the hinge on.  And I couldn't do it.  It was more difficult than screwing the mounting unit blindly and backward.  Unbelievable.   T had better luck with this step so I made him do it and take a tiny bit of credit for the installation.
Hinges clipped on, finally.
The hinges are completely invisible from outside!
Installed!  16 more doors to go!
It was quite a learning curve.  We spent about an hour per door for the first 3.  After finally getting the hang of it, we were able to move faster with the rest of the doors to complete installing them in two weekend afternoons.  Still, in no way was it as easy as depicted by Rockler's video:

I mean, sure, if I had one of those fancy flexible drills that probably cost too much!!   I'm happy with the result though, and too exhausted to exert further complaints, so I will shut up now.

On to the reveal!

Jul 17, 2011

Kitchen makeover, part 1: Before

I would LOVE to have a brand new kitchen with the latest appliances.  Alas, budget did not permit.  So we made do with what we have, and tried to improve it as much as possible. 

When we moved in, the kitchen looked like this:
When we've got the key: we are slowly replacing them appliances.

With previous owner's stuff: how do you like 'em wood?
They liked 'em wood lacquered and orange.
And I just HAVE to share this picture of the fridge nook wall:
What didn't kill me, made me stronger:  I steamed the wallpaper off in the middle of summer.

Before moving out, the previous owner must have let their dogs pee all over the cabinets, because they are disgustingly smelly and sticky!  And I'm talking rotting-fish kind of smell.  And melted-candy sort of sticky.  They must also liked deep-frying foods, as evidenced by the ever-present grease stains on and around the stove and on the ceiling (how, I ask you, does one get grease stains on the freaking ceiling???).

I almost threw up a few times during the process of cleaning up, since whatever different chemical cleaners we used did a very good job releasing the smells embedded in the kitchen.  But, none of them was able to really get rid of  the general ickiness.  We finally resorted this ultimate strip-all, clean-all, max-power stripping agent:


JASCO!  T has a love-hate relationship with this guy.  It cleans up everything, but oh, the fumes!  The painful heat when it touches your skin (have baking soda nearby)!  And the learning curve and numerous do-overs because we didn't put a thick enough layer (stripping is hard!  That's what she said!)!  After a few weeks, we finally got down to the bare wood (that's what she said again!):

Frames, insides, shelves, and doors.  I'm just showing the biggest cabinet here.  (See we had the fridge nook wall mudded after the wallpaper was removed.)

Then, we painted.  And we painted.  And we painted some more...

On to a glimpse of the painted cabinets and the hardware fiasco!

Jul 9, 2011

Ottoman makeover

After we moved in the house in November, long inspired by numerous DIY blogs, I bought a pair of ottomans from the Salvation Army for $10 each, thinking I'd make them over.  Easier thought than done, apparently.  Damn those blogs... why must they make everything look so easy?!  They really need to put warnings that "projects on blogs are harder than they appear" or something like that.

Anyway, I managed to strip one of them, remove most of the staples, stepped on one of said staples, found an excuse to take a (long, loooong) break, got nagged by T for not finishing up the project, and finally a few months later (this past weekend) got around to stripping the other one.  Gah!   It's not any easier the second time around, and it still took me 3+ hours and a blister to remove the staples, despite the shortcuts (no staple-stepping this time though).

Thankfully by now I had bought all the supplies (foam, batting, fabric, plywood support, staple gun, furniture legs), so this time I was actually able to put things together to finish!

In 2 days, I went from this:

To this:

Times two!

My ikea-filled living room!  Much better with the new ottomans!  To improve the sense of balance and an excuse to buy more furniture, get a second white chair!  Oh, the red couch will be slipcovered white (next project!), and the black side table will probably go elsewhere, and the blah of a rug will be replaced with a flokati / shag type (much to T's chagrin, but I'm the one that keeps the house, so what I say goes) for more glamour.

Quite a few mistakes were encountered through this project, such as:
  • 2" foam being too thin (get at least 3" foam for seating, and high-density foam is recommended).  I improvised by putting a 1/4" plywood underneath the foam so the sitter doesn't feel the slats that support the seat. 
  • I was planning to add a 1" high-density foam in the future for added comfort, but despite the hefty hem allowance, my fabric turned out to be too short as it is.  The hem was supposed to be stapled down to the frame, and it's just barely long enough as a slipcover.
  • Fit allowance almost wasn't enough.  I added only 1/8 allowance to the width/length for a tight fit, thinking the batting would be squashed down to nothing.  I was kind of right, except that it was so tight that some of the stitching ripped as I struggled to pull down the cover.  Apparently it could have been prevented by pulling down each corner bit by bit so the hem is almost at the same level at all time.
  • Not using upholstery thread.  Well, technically it's not a mistake yet since no stitching has unraveled from usage (knock on wood!), but I would recommend using upholstery threads for home sewing projects, as there is more usage and abusage to furniture than to clothes. 
All in all, it went well, and while this was a pretty basic makeover job, the sense of accomplishment is tremendous.  On to the next one!  Don't hold your breath though.  :D

Linking up to:
The DIY Show Off

Jul 4, 2011

Rolling stand for the gigantic printer

Update on the house:  construction is done, we moved in, and we've been quite content.

This long weekend I had quite a few things accomplished.  First, a new camera:

I picked Nikon Coolpix L120 over Panasonic Lumix DMC-ZS8 (which has similar features) mainly because it's more "pro" looking.  :)   And it's just the right motivator to get back to updating my blog(s).... which lead me to this circular saw:

 
Some of my projects and to-do's require basic woodworking, and I've been putting off these projects because I was intimidated by power tools.  Unfortunately (or fortunately?), the stress caused by the growing list of projects got the better of me.  In a brief moment of bravery, I bought the circular saw on Friday and started working right away.  

I cut some plywood (our first ever electric-sawing exercise!) into a big square and four little squares (using the term "square" very loosely here) and attach some casters to make this little rolling stand for my ginormous 80lb printer, which until now had to be dragged across the floor to reach the computer on the other side of the room, whenever we wanted to use it:

Ta da!  Nifty little stand...  My back thanks you!

Sep 5, 2010

What we've been up to

It's been 5 weeks since we've got the house, and the "rejuvenation project" - as my contractor calls it - is starting to take shape.

Rather than rambling on - nobody reads this blog anyway - why don't I just show the progress via pictures.  Here we go!

Living Room: We had the built-in bookcase removed, as we want to have an entertainment center or a library there.
before - with built-in bookcase
during - built-in gone + a literal hole in the wall
during - hole in the wall gone (pardon the increasing clutter)
On the other side of the former built-in, in the bonus room, we had a built-in cabinetry.  I hated it - it was finished in a half-assed manner and made the room felt like a garage.
cabinetry - ugh!  The backside of the built-in was hidden in this
About the only good thing about it was that it was very well built.  T and E had quite a workout demo-ing it.   I'm surprised the neighbors hadn't complained about the noise, because their method of "demo" is mostly hammering the hell out of everything until something falls down.

the other side of the hole in the wall, is the same hole in the wall.

Once the cabinets were gone and drywall up, the room feels much more open and airy, and less like a workshop.  I forgot to take a picture of the drywalled wall, but you're not missing much, seriously.


Ceiling:  The house throughout, except the main bathroom, has this type of wood slats and cross beams for the rather-low ceiling.
yup, a skylight.  It helps brightening up the living room.  Although it probably wouldn't be good for TV-watching.
We're going to repaint it with Benjamin Moore Simply White, so yours truly spent a good part of the past two weekends sanding all the slats and beams (twice for the gloss-painted kitchen ceiling) while T pretended to be busy with everything else to avoid participating in this activity.  I don't blame him, it's about as enjoyable as standing under hot steam while removing wallpaper.

Bathroom: We didn't plan on doing anything on the bathroom, since everything was in working order.  Ugly, yes, but functional.  Let's just wait on remodeling it later, after we move in. 
Of course, that was the original intention.  Lo and behold, one thing led to another:
sky-blue walls, brown tiles, vinyl floor.  Oh my.
original 50's tiles were removed.
The saying "they didn't make 'em like they used to" rang true in this case.  T and E were drenched in sweat after removing the tiles.  (It was also a 90-degree day, too).

empty slate.
I wanted to get a claw-foot tub, but they're apparently expensive and the underneath of the tub is unfinished cement and dirt.  So there went that idea... the tub stays :(

Next, I'll post an update on the other rooms.